
Log Shipping in SQL Server is a very old and popular feature most widely used to mostly enable disaster-recovery solution for the application databases. SQL Server Log shipping allows us to automatically send transaction log backups from a primary database on a primary server instance to one or more secondary databases on separate secondary server instances. The transaction log backups are applied to each of the secondary databases individually. An optional third server instance, known as the monitor server, records the history and status of backup and restore operations and, optionally, raises alerts if these operations fail to occur as scheduled.
What editions of SQL Server is log shipping available in?
Log shipping is a Database level not server level if you add database users it will reflect on secondary but not login could not reflect due to server level limitation to reflect login we need s p_help_rev_login by manual work
Log shipping supports both Recovery model Full and Bulk logged not simple recovery model
Log shipping is for Disaster Recovery but Automatic Fail over is not possible We have to do manual fail over
Log shipping is support one or more secondary
Log shipping you cant' able to configure it with in same server act as primary/secondary
Log shipping needs both server should be same version then only read-only option enable other wise(i.e different version SQL 2008 to SQL 2012) it gives error as database upgrade is needed then you can able to setup secondary database as with no recovery only
 SQL Server log shipping is a technique which involves two or more SQL Server instances and copying of a transaction log file from one SQL Server instance to another. The process of transferring the transaction log files and restoring is automated across the SQL Servers. As the process result there are two copies of the data on two separate locations
To monitor a log shipping configuration, you must add the monitor server when you enable log shipping. If you add a monitor server later, you must remove the log shipping configuration and then replace it with a new configuration that includes a monitor server. For more information, Furthermore, after the monitor server has been configured, it cannot be changed without removing log shipping first.
Here We can see the Source Server(Primary Server) see the basic tables and logins

Here We can see the Destination Server(Secondary Server).gif")
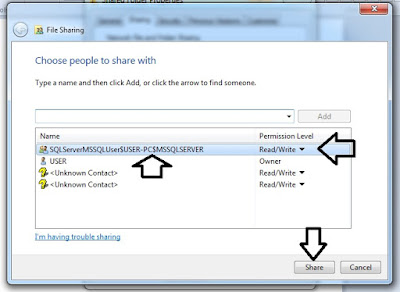
 also see folder must be Shared and Read/Write permission
Just Right Click Folder and choose Properties and choose Sharing Tab to select this as below
Also see the Shared folder local path as show below
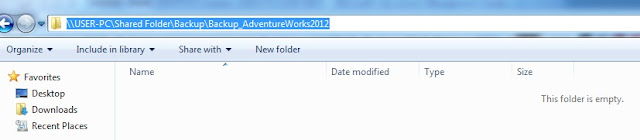
Also see the Shared folder network path as show below
Step 1:
Now We need to take Full Backup of Source (Primary server ) as see below

just click Remove button remove existing backup default setting


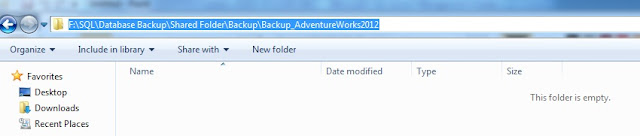
Kindly verify backed up location as see below


As same as Copy folder structure as see below


Now we logged into Destination folder and Click Restore Database

Now We need to select backup file from Network Backup Shared Folder as see below
 if it is new db then don't need to select/tick relocate all files to folder option

but if it is already some same name of database exist in folder then it will through error as see below

it is due to more db name have same name of db exists on that folder as see below
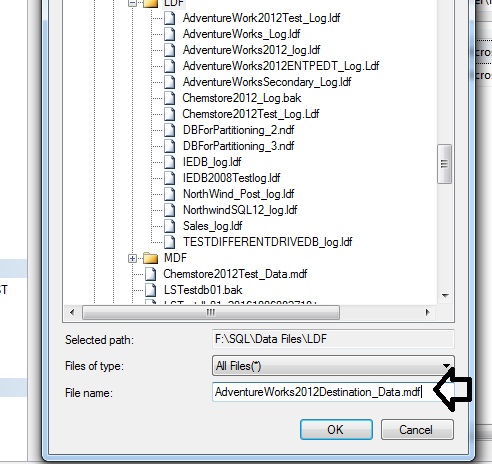
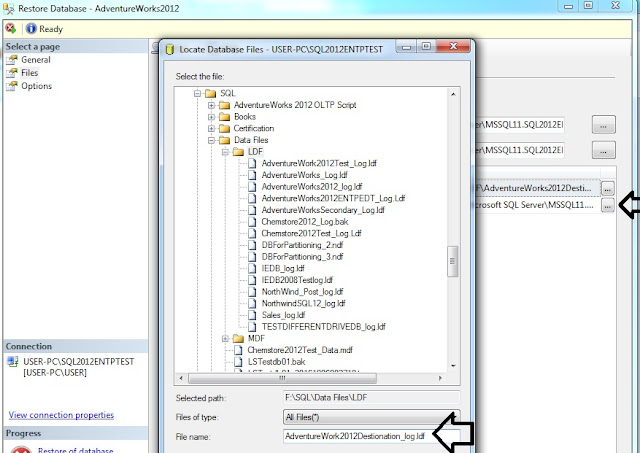
 so to avoid this we should select/ticket Relocate all files to folder as see below but we need to select elipse ... -->option choose / type new path location
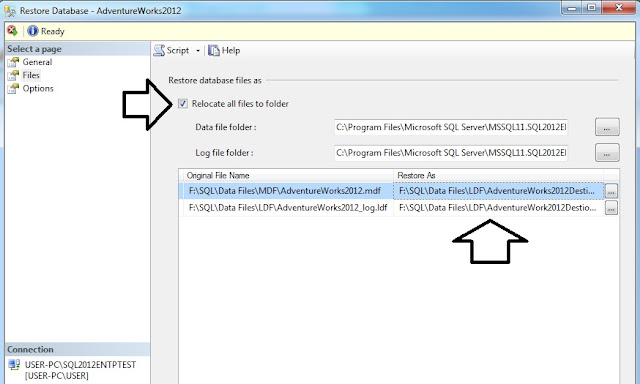
Now we type new path as see below
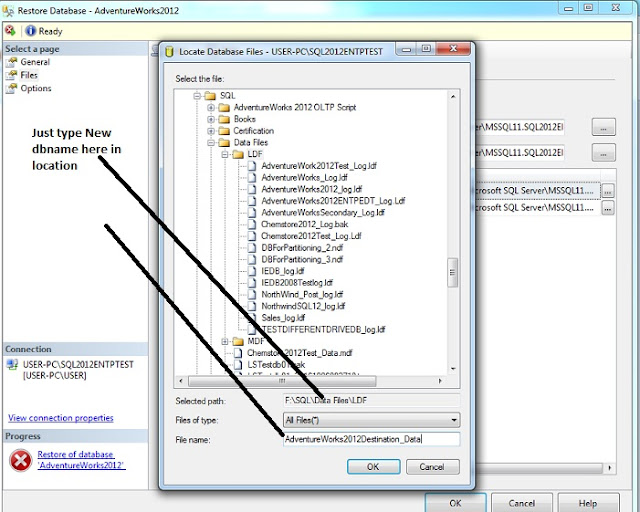
Now we need to specify/type new path location as see below
Now we go to Options Tab and select Restore with Standby option as see below
Restore with recovery ----------DB ready to use cant add any more files transaction log,backup
Restore with No_recovery--DB still allows more files to add like transaction log,diff but user can't access db
Restore with stand by--------DB can allows read only but only restore transaction log can't restore Backup file


Now you can see in secondary server of restored db with stand by option as see below

Now we are ready to configure log shipping
Step 2:
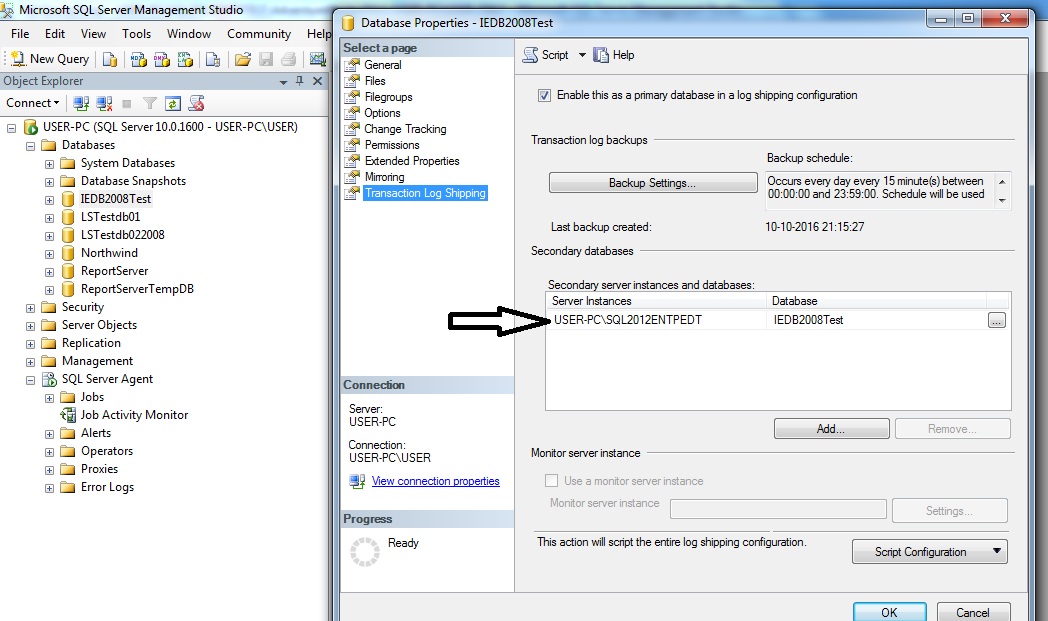
Now we go to Primary Server and go to Primary server database and right click and choose properties as see below

see below pic will come then kindly choose Transaction log shipping

Now we click check box of Enable this as primary databases as see below now click Backup Settings option

Now we go to shared folder and verify and ensure it should be shared folder or kindly make it as
Shared folder as right click folder and choose shared from share tab
Note:
NT Service & NT network service & NT MS SQL AGENT & everyone & MS SQL Server$instance have all read/write permission or not
kindly copy it network path as see below

After clicked Backup setting below picture appears
Note:
Network path is compulsory

you can go to network path as RUN-->network folder as ensure whether it is working or not

After that click ADD Button to configure Secondary as see below

connect option button to choose Secondary server and choose right database and go through three tabs as see below

we can give local path or network path both should work in copy tab

we can also give network path as see below

Now we can go for third tab as restore Transaction log as see below

After click submit as see below
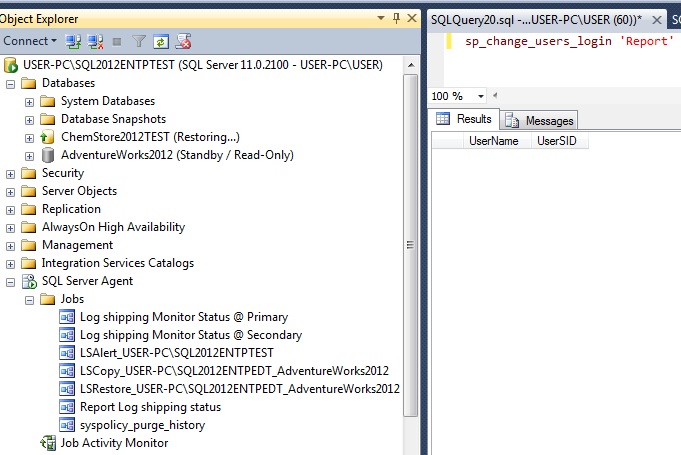
 Now we can go for SQL Agent then expand jobs tab and see job list as see below


see job succeeded message as see below

Now refresh in server name with as see below


now we need to run both copy and restore job as see below

Kindly see the job succeeded see below

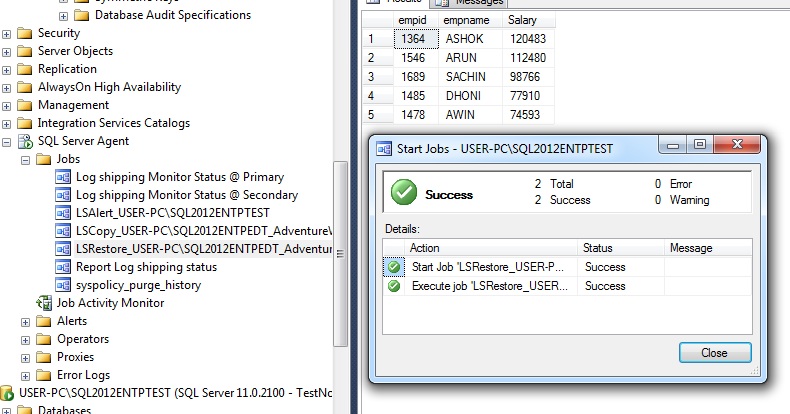
Now we run restore job

restore job succeeded message as see below
 Now we go for secondary and refresh server as see below method 2 to for refresh server

Now we go with reports of secondary server
 see the report of secondary as see below


we can also see this report using below T-SQL(we need to run this query in secondary server)
SELECT secondary_server,
secondary_database,
primary_server,
primary_database,
last_copied_file,
last_copied_date,
last_restored_file,
last_restored_date
from [ms db].[d b o].log_shipping_monitor_secondary

Now we can see backup details in primary server as see below
we need to run in primary server
-- Assign the database name to variable below
DECLARE @db_name VAR CHAR(100)
SELECT @db_name = 'database name'
-- query
SELECT TOP (30) s.database_name
,m.physical_device_name
,CAST(CAST(s.backup_size / 1000000 AS INT) AS VAR CHAR(14)) + ' ' + 'MB' AS b k Size
,CAST(DATE DIFF(second, s.backup_start_date, s.backup_finish_date) AS VAR CHAR(4)) + ' ' + 'Seconds' Time Taken
,s.backup_start_date
,CAST(s.first_l s n AS VAR CHAR(50)) AS first_l s n
,CAST(s.last_l s n AS VAR CHAR(50)) AS last_l s n
,CASE s.[type] WHEN 'D'
THEN 'Full'
WHEN 'I'
THEN 'Differential'
WHEN 'L'
THEN 'Transaction Log'
END AS [Backup Type]
,s.server_name
,s.recovery_model
FROM ms db.d b o.backupset s
INNER JOIN ms db.dbo.backupmediafamily m ON s.media_set_id = m.media_set_id
WHERE s.database_name = @db_name
ORDER BY backup_start_date DESC
,backup_finish_date


After each D M L operation next job runs it will reflect it on secondary from primary
logins are reflected to secondary but we need to solve it orphan users on secondary

So we need to use sp_helprevlogin script
USE master
GO
IF OBJECT_ID ('sp_hexadecimal') IS NOT NULL
DROP PROCEDURE sp_hexadecimal
GO
CREATE PROCEDURE sp_hexadecimal
@binvalue varbinary(256),
@hexvalue varchar (514) OUTPUT
AS
DECLARE @charvalue varchar (514)
DECLARE @i int
DECLARE @length int
DECLARE @hexstring char(16)
SELECT @charvalue = '0x'
SELECT @i = 1
SELECT @length = DATALENGTH (@binvalue)
SELECT @hexstring = '0123456789ABCDEF'
WHILE (@i <= @length)
BEGIN
DECLARE @tempint int
DECLARE @firstint int
DECLARE @secondint int
SELECT @tempint = CONVERT(int, SUBSTRING(@binvalue,@i,1))
SELECT @firstint = FLOOR(@tempint/16)
SELECT @secondint = @tempint - (@firstint*16)
SELECT @charvalue = @charvalue +
SUBSTRING(@hexstring, @firstint+1, 1) +
SUBSTRING(@hexstring, @secondint+1, 1)
SELECT @i = @i + 1
END
SELECT @hexvalue = @charvalue
GO
IF OBJECT_ID ('sp_help_revlogin') IS NOT NULL
DROP PROCEDURE sp_help_revlogin
GO
CREATE PROCEDURE sp_help_revlogin @login_name sysname = NULL AS
DECLARE @name sysname
DECLARE @type varchar (1)
DECLARE @hasaccess int
DECLARE @denylogin int
DECLARE @is_disabled int
DECLARE @PWD_varbinary varbinary (256)
DECLARE @PWD_string varchar (514)
DECLARE @SID_varbinary varbinary (85)
DECLARE @SID_string varchar (514)
DECLARE @tmpstr varchar (1024)
DECLARE @is_policy_checked varchar (3)
DECLARE @is_expiration_checked varchar (3)
DECLARE @defaultdb sysname
IF (@login_name IS NULL)
DECLARE login_curs CURSOR FOR
SELECT p.sid, p.name, p.type, p.is_disabled, p.default_database_name, l.hasaccess, l.denylogin FROM
sys.server_principals p LEFT JOIN sys.syslogins l
ON ( l.name = p.name ) WHERE p.type IN ( 'S', 'G', 'U' ) AND p.name <> 'sa'
ELSE
DECLARE login_curs CURSOR FOR
SELECT p.sid, p.name, p.type, p.is_disabled, p.default_database_name, l.hasaccess, l.denylogin FROM
sys.server_principals p LEFT JOIN sys.syslogins l
ON ( l.name = p.name ) WHERE p.type IN ( 'S', 'G', 'U' ) AND p.name = @login_name
OPEN login_curs
FETCH NEXT FROM login_curs INTO @SID_varbinary, @name, @type, @is_disabled, @defaultdb, @hasaccess, @denylogin
IF (@@fetch_status = -1)
BEGIN
PRINT 'No login(s) found.'
CLOSE login_curs
DEALLOCATE login_curs
RETURN -1
END
SET @tmpstr = '/* sp_help_revlogin script '
PRINT @tmpstr
SET @tmpstr = '** Generated ' + CONVERT (varchar, GETDATE()) + ' on ' + @@SERVERNAME + ' */'
PRINT @tmpstr
PRINT ''
WHILE (@@fetch_status <> -1)
BEGIN
IF (@@fetch_status <> -2)
BEGIN
PRINT ''
SET @tmpstr = '-- Login: ' + @name
PRINT @tmpstr
IF (@type IN ( 'G', 'U'))
BEGIN -- NT authenticated account/group
SET @tmpstr = 'CREATE LOGIN ' + QUOTENAME( @name ) + ' FROM WINDOWS WITH DEFAULT_DATABASE = [' + @defaultdb + ']'
END
ELSE BEGIN -- SQL Server authentication
-- obtain password and sid
SET @PWD_varbinary = CAST( LOGINPROPERTY( @name, 'PasswordHash' ) AS varbinary (256) )
EXEC sp_hexadecimal @PWD_varbinary, @PWD_string OUT
EXEC sp_hexadecimal @SID_varbinary,@SID_string OUT
-- obtain password policy state
SELECT @is_policy_checked = CASE is_policy_checked WHEN 1 THEN 'ON' WHEN 0 THEN 'OFF' ELSE NULL END FROM sys.sql_logins WHERE name = @name
SELECT @is_expiration_checked = CASE is_expiration_checked WHEN 1 THEN 'ON' WHEN 0 THEN 'OFF' ELSE NULL END FROM sys.sql_logins WHERE name = @name
SET @tmpstr = 'CREATE LOGIN ' + QUOTENAME( @name ) + ' WITH PASSWORD = ' + @PWD_string + ' HASHED, SID = ' + @SID_string + ', DEFAULT_DATABASE = [' + @defaultdb + ']'
IF ( @is_policy_checked IS NOT NULL )
BEGIN
SET @tmpstr = @tmpstr + ', CHECK_POLICY = ' + @is_policy_checked
END
IF ( @is_expiration_checked IS NOT NULL )
BEGIN
SET @tmpstr = @tmpstr + ', CHECK_EXPIRATION = ' + @is_expiration_checked
END
END
IF (@denylogin = 1)
BEGIN -- login is denied access
SET @tmpstr = @tmpstr + '; DENY CONNECT SQL TO ' + QUOTENAME( @name )
END
ELSE IF (@hasaccess = 0)
BEGIN -- login exists but does not have access
SET @tmpstr = @tmpstr + '; REVOKE CONNECT SQL TO ' + QUOTENAME( @name )
END
IF (@is_disabled = 1)
BEGIN -- login is disabled
SET @tmpstr = @tmpstr + '; ALTER LOGIN ' + QUOTENAME( @name ) + ' DISABLE'
END
PRINT @tmpstr
END
FETCH NEXT FROM login_curs INTO @SID_varbinary, @name, @type, @is_disabled, @defaultdb, @hasaccess, @denylogin
END
CLOSE login_curs
DEALLOCATE login_curs
RETURN 0
GO
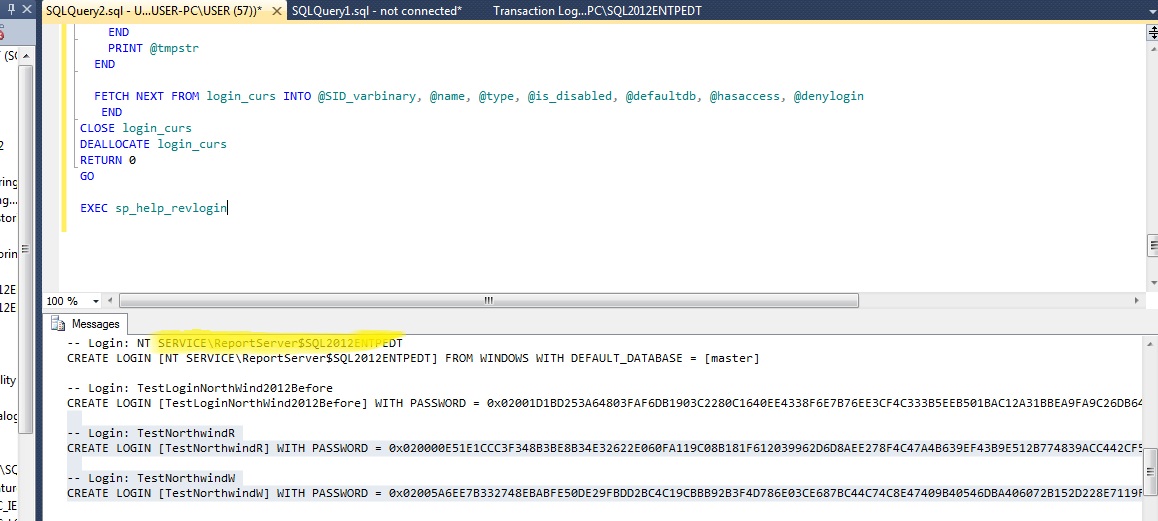
EXEC sp_help_revlogin
Kindly see below execute sp_help_revlogin script on Source Server and copy it
Paste it on Destination Server and execute it as see below

Now see it on destination server master and user database as see below
Now you can see orphan report shows as null as all are fixed
Now we can able to logged in both login without any error


Now we need to Run Backup job @ Primary Server as see below

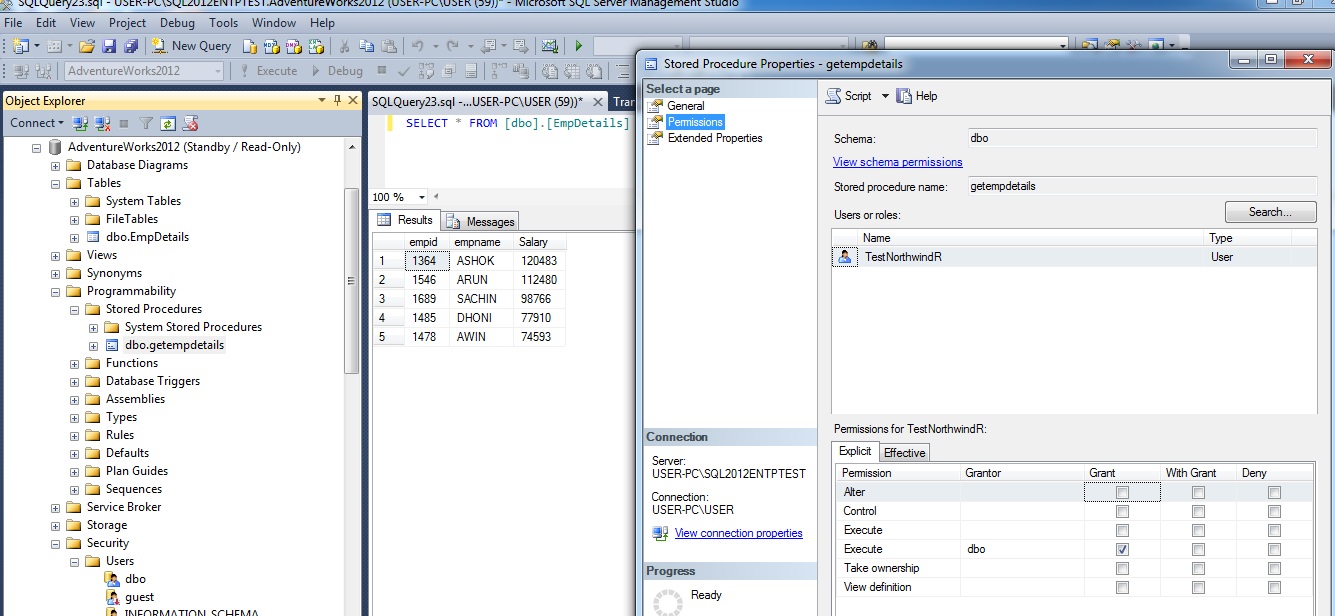
Now we destination Server shows table and stored procedure old record and permissions
Now we see before run Copy & Restore job table is showing old data and now we are going to copy job as see below

Now we are going to Run Restore job as see below
Now we updated records reflected on Destination as see below


h t t p://s q l mag.com/database-high-availability/3-log-shipping-techniques
h t t p://w w w .s q l shack.com/s q l-server-log-shipping/
Remove log shipping in SQL Server
Here we can see SQL 2008 server to SQL 2012 Just right click on Source server SQL 2008 database as see below
After click ... button it will open as see below then just click

It will open secondary database setting as see below
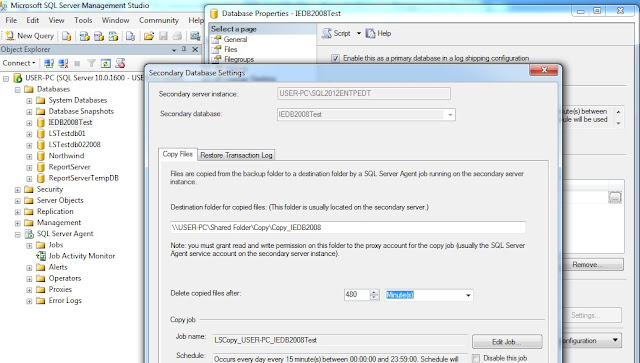
Now just click remove button as see below

after remove secondary jobs now remove tick from enable this as option as see below


After submit button it will remove jobs on primary and secondary and remove log shipping configurations as see below

Here you can job removed completely
 After remove log shipping configurations see below it is complete remove jobs and database not configured see below

Thanks for Reading
What editions of SQL Server is log shipping available in?
- 2012 – Enterprise, Business Intelligence, Standard, and Web
- 2008 R2 – Data center, Enterprise, Standard, Web, and Work group
- 2008 – Enterprise, Standard, Web, and Work group
- 2005 – Enterprise, Standard, and Work group
Log shipping is a Database level not server level if you add database users it will reflect on secondary but not login could not reflect due to server level limitation to reflect login we need s p_help_rev_login by manual work
Log shipping supports both Recovery model Full and Bulk logged not simple recovery model
Log shipping is for Disaster Recovery but Automatic Fail over is not possible We have to do manual fail over
Log shipping is support one or more secondary
Log shipping you cant' able to configure it with in same server act as primary/secondary
Log shipping needs both server should be same version then only read-only option enable other wise(i.e different version SQL 2008 to SQL 2012) it gives error as database upgrade is needed then you can able to setup secondary database as with no recovery only

A log shipping session involves the following steps:
- Backing up the transaction log file on the primary SQL Server instance
- Copying the transaction log backup file across the network to one or more secondary SQL Server instances
- Restoring the transaction log backup file on the secondary SQL Server instances
Implementation examples
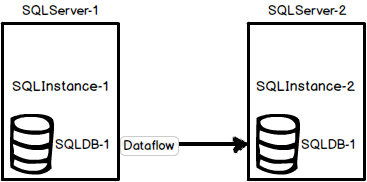
One of the common log shipping scenarios is the environment with two servers (SQL Server-1 – primary and SQL Server-2 – secondary), two SQL Server instances (SQL Instance-1 and SQL Instance-2), and one SQL Server database named SQL DB-1 with log shipping running on it
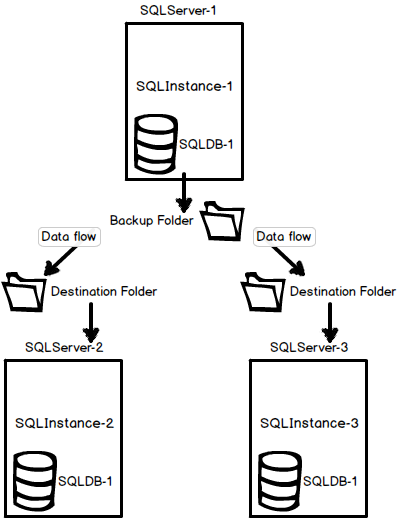
Another common configuration is the environment with three (or more) servers (SQL Server-1 – primary, SQL Server-2 – secondary, and SQL Server-3 – secondary), three SQL Server instances (SQL Instance-1, SQL Instance-2, and SQL Instance-3), and one SQL Server database named SQL DB-1 with log shipping running on it
Operating modes
There are two available modes and they are related to the state in which the secondary, log shipped, SQL Server database will be:
- Standby mode – the database is available for querying and users can access it, but in read-only mode
- The database is not available only while the restore process is running
- Users can be forced to disconnect when the restore job commence
- The restore job can be delayed until all users disconnect themselves
- The database is not available only while the restore process is running
- Restore mode – the database is not accessible
Advantages and disadvantages of using SQL Server log shipping
SQL Server log shipping is primarily used as a disaster recovery solution. Using SQL Server log shipping has multiple benefits: it’s reliable and tested in details, it’s relatively easy to set up and maintain, there is a possibility for fail over between SQL Servers, data can be copied on more than one location etc.
Log shipping can be combined with other disaster recovery options such as Always On Availability Groups, database mirroring, and database replication. Also, SQL Server log shipping has low cost in human and server resources
The main disadvantages in the SQL Server log shipping technique are: need to manage all the databases separately, there isn’t possibility for an automatic fail over, and secondary database isn’t fully readable while the restore process is running
Monitoring Log Shipping
After you have configured log shipping, you can monitor information about the status of all the log shipping servers. The history and status of log shipping operations are always saved locally by the log shipping jobs. The history and status of the backup operation are stored at the primary server, and the history and status of the copy and restore operations are stored at the secondary server. If you have implemented a remote monitor server, this information is also stored on the monitor server.
You can configure alerts that will fire if log shipping operations fail to occur as scheduled. Errors are raised by an alert job that watches the status of the backup and restore operations. You can define alerts that notify an operator when these errors are raised. If a monitor server is configured, one alert job runs on the monitor server that raises errors for all operations in the log shipping configuration. If a monitor server is not specified, an alert job runs on the primary server instance, which monitors the backup operation. If a monitor server is not specified, an alert job also runs on each secondary server instance to monitor the local copy and restore operations.
Note:To monitor a log shipping configuration, you must add the monitor server when you enable log shipping. If you add a monitor server later, you must remove the log shipping configuration and then replace it with a new configuration that includes a monitor server. For more information, Furthermore, after the monitor server has been configured, it cannot be changed without removing log shipping first.
Here We can see the Source Server(Primary Server) see the basic tables and logins

Here We can see the Destination Server(Secondary Server)


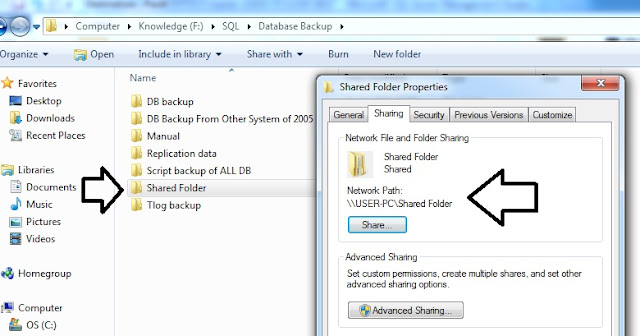
Just Right Click Folder and choose Properties and choose Sharing Tab to select this as below

Also see the Shared folder local path as show below

Also see the Shared folder network path as show below

Step 1:
Now We need to take Full Backup of Source (Primary server ) as see below

just click Remove button remove existing backup default setting

Just now Click Add button

Just Click Overwrite option and tick verify backup when finished you can also Compress backup (if backup size is large optional)

After click submit button we can backup has been Succeeded message as see below


Now we can see the shared folder structure as see below

Inside Backup location as see below Backup_database_name

As same as Copy folder structure as see below
Now we need to copy and paste it into Backup folder of shared network path as see below
Now we logged into Destination folder and Click Restore Database


but if it is already some same name of database exist in folder then it will through error as see below

it is due to more db name have same name of db exists on that folder as see below


Now we type new path as see below

Now we need to specify/type new path location as see below


Now we go to Options Tab and select Restore with Standby option as see below
Restore with recovery ----------DB ready to use cant add any more files transaction log,backup
Restore with No_recovery--DB still allows more files to add like transaction log,diff but user can't access db
Restore with stand by--------DB can allows read only but only restore transaction log can't restore Backup file

When we select yes option DB Restore successfully as see below

Now you can see in secondary server of restored db with stand by option as see below

Now we are ready to configure log shipping
Step 2:
Now we go to Primary Server and go to Primary server database and right click and choose properties as see below


Now we click check box of Enable this as primary databases as see below now click Backup Settings option

Now we go to shared folder and verify and ensure it should be shared folder or kindly make it as
Shared folder as right click folder and choose shared from share tab
Note:
NT Service & NT network service & NT MS SQL AGENT & everyone & MS SQL Server$instance have all read/write permission or not
kindly copy it network path as see below

After clicked Backup setting below picture appears
Note:
Network path is compulsory

you can go to network path as RUN-->network folder as ensure whether it is working or not

After that click ADD Button to configure Secondary as see below
connect option button to choose Secondary server and choose right database and go through three tabs as see below
we can give local path or network path both should work in copy tab
we can also give network path as see below
Now we can go for third tab as restore Transaction log as see below
After click submit as see below


Now right click and start job as see below

see job succeeded message as see below

Now refresh in server name with as see below

Now go with report as see below
Now see the report as see below
Now we logged into Secondary server and Run job as same method

or we can go with job activity monitor click Filter and type name and choose apply filter as see below
now we need to run both copy and restore job as see below

Kindly see the job succeeded see below

Now we run restore job

restore job succeeded message as see below


Now we go with reports of secondary server

we can also see this report using below T-SQL(we need to run this query in secondary server)
SELECT secondary_server,
secondary_database,
primary_server,
primary_database,
last_copied_file,
last_copied_date,
last_restored_file,
last_restored_date
from [ms db].[d b o].log_shipping_monitor_secondary
Now we can see backup details in primary server as see below
we need to run in primary server
-- Assign the database name to variable below
DECLARE @db_name VAR CHAR(100)
SELECT @db_name = 'database name'
-- query
SELECT TOP (30) s.database_name
,m.physical_device_name
,CAST(CAST(s.backup_size / 1000000 AS INT) AS VAR CHAR(14)) + ' ' + 'MB' AS b k Size
,CAST(DATE DIFF(second, s.backup_start_date, s.backup_finish_date) AS VAR CHAR(4)) + ' ' + 'Seconds' Time Taken
,s.backup_start_date
,CAST(s.first_l s n AS VAR CHAR(50)) AS first_l s n
,CAST(s.last_l s n AS VAR CHAR(50)) AS last_l s n
,CASE s.[type] WHEN 'D'
THEN 'Full'
WHEN 'I'
THEN 'Differential'
WHEN 'L'
THEN 'Transaction Log'
END AS [Backup Type]
,s.server_name
,s.recovery_model
FROM ms db.d b o.backupset s
INNER JOIN ms db.dbo.backupmediafamily m ON s.media_set_id = m.media_set_id
WHERE s.database_name = @db_name
ORDER BY backup_start_date DESC
,backup_finish_date
After each D M L operation next job runs it will reflect it on secondary from primary
logins are reflected to secondary but we need to solve it orphan users on secondary
So we need to use sp_helprevlogin script
USE master
GO
IF OBJECT_ID ('sp_hexadecimal') IS NOT NULL
DROP PROCEDURE sp_hexadecimal
GO
CREATE PROCEDURE sp_hexadecimal
@binvalue varbinary(256),
@hexvalue varchar (514) OUTPUT
AS
DECLARE @charvalue varchar (514)
DECLARE @i int
DECLARE @length int
DECLARE @hexstring char(16)
SELECT @charvalue = '0x'
SELECT @i = 1
SELECT @length = DATALENGTH (@binvalue)
SELECT @hexstring = '0123456789ABCDEF'
WHILE (@i <= @length)
BEGIN
DECLARE @tempint int
DECLARE @firstint int
DECLARE @secondint int
SELECT @tempint = CONVERT(int, SUBSTRING(@binvalue,@i,1))
SELECT @firstint = FLOOR(@tempint/16)
SELECT @secondint = @tempint - (@firstint*16)
SELECT @charvalue = @charvalue +
SUBSTRING(@hexstring, @firstint+1, 1) +
SUBSTRING(@hexstring, @secondint+1, 1)
SELECT @i = @i + 1
END
SELECT @hexvalue = @charvalue
GO
IF OBJECT_ID ('sp_help_revlogin') IS NOT NULL
DROP PROCEDURE sp_help_revlogin
GO
CREATE PROCEDURE sp_help_revlogin @login_name sysname = NULL AS
DECLARE @name sysname
DECLARE @type varchar (1)
DECLARE @hasaccess int
DECLARE @denylogin int
DECLARE @is_disabled int
DECLARE @PWD_varbinary varbinary (256)
DECLARE @PWD_string varchar (514)
DECLARE @SID_varbinary varbinary (85)
DECLARE @SID_string varchar (514)
DECLARE @tmpstr varchar (1024)
DECLARE @is_policy_checked varchar (3)
DECLARE @is_expiration_checked varchar (3)
DECLARE @defaultdb sysname
IF (@login_name IS NULL)
DECLARE login_curs CURSOR FOR
SELECT p.sid, p.name, p.type, p.is_disabled, p.default_database_name, l.hasaccess, l.denylogin FROM
sys.server_principals p LEFT JOIN sys.syslogins l
ON ( l.name = p.name ) WHERE p.type IN ( 'S', 'G', 'U' ) AND p.name <> 'sa'
ELSE
DECLARE login_curs CURSOR FOR
SELECT p.sid, p.name, p.type, p.is_disabled, p.default_database_name, l.hasaccess, l.denylogin FROM
sys.server_principals p LEFT JOIN sys.syslogins l
ON ( l.name = p.name ) WHERE p.type IN ( 'S', 'G', 'U' ) AND p.name = @login_name
OPEN login_curs
FETCH NEXT FROM login_curs INTO @SID_varbinary, @name, @type, @is_disabled, @defaultdb, @hasaccess, @denylogin
IF (@@fetch_status = -1)
BEGIN
PRINT 'No login(s) found.'
CLOSE login_curs
DEALLOCATE login_curs
RETURN -1
END
SET @tmpstr = '/* sp_help_revlogin script '
PRINT @tmpstr
SET @tmpstr = '** Generated ' + CONVERT (varchar, GETDATE()) + ' on ' + @@SERVERNAME + ' */'
PRINT @tmpstr
PRINT ''
WHILE (@@fetch_status <> -1)
BEGIN
IF (@@fetch_status <> -2)
BEGIN
PRINT ''
SET @tmpstr = '-- Login: ' + @name
PRINT @tmpstr
IF (@type IN ( 'G', 'U'))
BEGIN -- NT authenticated account/group
SET @tmpstr = 'CREATE LOGIN ' + QUOTENAME( @name ) + ' FROM WINDOWS WITH DEFAULT_DATABASE = [' + @defaultdb + ']'
END
ELSE BEGIN -- SQL Server authentication
-- obtain password and sid
SET @PWD_varbinary = CAST( LOGINPROPERTY( @name, 'PasswordHash' ) AS varbinary (256) )
EXEC sp_hexadecimal @PWD_varbinary, @PWD_string OUT
EXEC sp_hexadecimal @SID_varbinary,@SID_string OUT
-- obtain password policy state
SELECT @is_policy_checked = CASE is_policy_checked WHEN 1 THEN 'ON' WHEN 0 THEN 'OFF' ELSE NULL END FROM sys.sql_logins WHERE name = @name
SELECT @is_expiration_checked = CASE is_expiration_checked WHEN 1 THEN 'ON' WHEN 0 THEN 'OFF' ELSE NULL END FROM sys.sql_logins WHERE name = @name
SET @tmpstr = 'CREATE LOGIN ' + QUOTENAME( @name ) + ' WITH PASSWORD = ' + @PWD_string + ' HASHED, SID = ' + @SID_string + ', DEFAULT_DATABASE = [' + @defaultdb + ']'
IF ( @is_policy_checked IS NOT NULL )
BEGIN
SET @tmpstr = @tmpstr + ', CHECK_POLICY = ' + @is_policy_checked
END
IF ( @is_expiration_checked IS NOT NULL )
BEGIN
SET @tmpstr = @tmpstr + ', CHECK_EXPIRATION = ' + @is_expiration_checked
END
END
IF (@denylogin = 1)
BEGIN -- login is denied access
SET @tmpstr = @tmpstr + '; DENY CONNECT SQL TO ' + QUOTENAME( @name )
END
ELSE IF (@hasaccess = 0)
BEGIN -- login exists but does not have access
SET @tmpstr = @tmpstr + '; REVOKE CONNECT SQL TO ' + QUOTENAME( @name )
END
IF (@is_disabled = 1)
BEGIN -- login is disabled
SET @tmpstr = @tmpstr + '; ALTER LOGIN ' + QUOTENAME( @name ) + ' DISABLE'
END
PRINT @tmpstr
END
FETCH NEXT FROM login_curs INTO @SID_varbinary, @name, @type, @is_disabled, @defaultdb, @hasaccess, @denylogin
END
CLOSE login_curs
DEALLOCATE login_curs
RETURN 0
GO
EXEC sp_help_revlogin
Kindly see below execute sp_help_revlogin script on Source Server and copy it
Paste it on Destination Server and execute it as see below
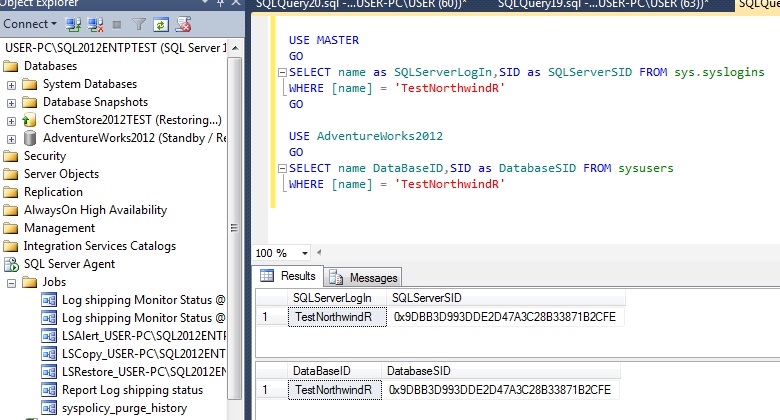
Now see it on destination server master and user database as see below
Now you can see orphan report shows as null as all are fixed
Now we can able to logged in both login without any error
Now we can test whether update on table and permissions on Primary are reflecting on Secondary or not
Now we add TestNorthwindW Read/Write permissions as see below
Now we destination Server shows table and stored procedure old record and permissions
Now we are going to Run Restore job as see below
Now we updated records reflected on Destination as see below
Also see destination server shows permissions reflected as see below
Reverse Log shipping or Manual Fail Over with Log shipping:
Recent SQL Server releases have had a major focus on high availability. Early previews of the next release of SQL Server, code-named Denali (SQL Server 2012), show that this trend will continue. Somewhere in the midst of the new availability technologies and feature sets, log shipping seems to have fallen by the wayside. Although log shipping received a much-needed face lift with SQL Server 2005, there were only minor enhancements in SQL Server 2008.
Although log shipping isn’t as widely used as it once was, it’s still a vital tool that has many applications, such as using warm standbys for disaster recovery, migrating large databases, and providing read-only access to data. Log shipping isn’t difficult to understand or use. There are three techniques that can save you a lot of time and make working with log shipping painless: reversing log shipping, switching between log shipping and database mirroring, and converting log shipping to t r a n s a c t i o n a l replication.
Reversing Log Shipping
Reversing log shipping is an often overlooked practice. When D B A s need to fail over to a secondary log shipping server, they tend to worry about getting log shipping back up later. This is especially true in the case of very large databases. If you're using log shipping as your primary disaster recovery solution and you need to fail over to the secondary log shipping server, you should get log shipping running as quickly as possible. With no disaster recovery fail over in place, you might be running exposed.
Reversing log shipping is simple. It doesn’t require re initializing the database with a full backup if performed carefully. However, it’s crucial that you remember the following:
- You need to preserve the log sequence number (L S N) chain.
- You need to perform the final log backup using the NO RECOVERY option. Backing up the log with this option puts the database in a state that allows log backups to be restored and ensures that the database’s L S N chain doesn’t deviate.
- The primary log shipping server must still be accessible to use this technique.
To fail over to a secondary log shipping server, follow this 10-step process:
- Disable all backup jobs that might back up the database on both log shipping partners.
- Disable the log shipping jobs.
- Run each log shipping job in order (i.e., backup, copy, and restore).
- Drop log shipping.
- Manually back up the log of the primary database using the NO RECOVERY option. Use the command
where Database Name is the name of the database whose log you want to back up and Backup File Path name is the backup file’s path name (e.g., Z:\SQL Server Backups\T L o g.b c k).BACKUP LOG [Database Name] TO DISK = 'Backup File Path name' WITH NO RECOVERY; - Restore the log backup on the secondary database using the RECOVERY option, and bring the secondary database online. The primary and secondary databases have now switched positions.
- Back up the log of the new primary database (optional).
- Restore the log on the new secondary database using the NO RECOVERY option (optional).
- Reconfigure log shipping.
- Re-enable any backup jobs that were disabled.
Note that step 7 and step 8 are listed as optional because they’re not required for establishing log shipping. However, I recommend performing these steps to ensure that the log shipping configuration will proceed without any problems.
With a few minor adjustments, this 10-step process works with multiple secondary log shipping databases. You perform the same basic steps, keeping in mind that the other secondary databases will still be secondary databases after the fail over. After you back up the log on the new primary database, you should use the NO RECOVERY option to restore that backup on all the planned secondary databases. You can then add them as secondary databases to the new primary database.
More Ref:h t t p://s q l mag.com/database-high-availability/3-log-shipping-techniques
h t t p://w w w .s q l shack.com/s q l-server-log-shipping/
Remove log shipping in SQL Server
Here we can see SQL 2008 server to SQL 2012 Just right click on Source server SQL 2008 database as see below
After click ... button it will open as see below then just click


After submit button it will remove jobs on primary and secondary and remove log shipping configurations as see below
Here you can job removed completely
Thanks for Reading
No comments:
Post a Comment